

You’re about to take your live streaming game to the next level with a Kick Viewer Bot. But before you can start automating kicks and keeping your channel tidy, you need to set it up correctly. You’ve got a lot of decisions to make, from choosing the right bot software to customizing kick viewer settings. It’s a process that requires attention to detail, but don’t worry, you’re about to get a comprehensive guide to walk you through it. So, are you ready to learn how to configure your bot and take control of your channel?
Choosing the Right Bot Software
Pick a bot software that’s right for you, and you’ll be kicking viewers in no time buy kick followers.
Don’t worry, we won’t leave you hanging – choosing the right software is crucial to your bot’s success. You’ll want to consider factors like ease of use, customization options, and compatibility with your streaming platform.
Some popular bot software options include Streamlabs, Nightbot, and Moobot.
Each has its own strengths and weaknesses, so take some time to research and compare their features.
If you’re new to bot software, you might want to start with something user-friendly like Streamlabs, which offers a range of pre-built commands and a simple interface.
On the other hand, if you’re looking for more advanced customization, Nightbot might be the way to go.
Whatever you choose, make sure it’s something you’re comfortable with, as you’ll be working with it closely to manage your viewers.
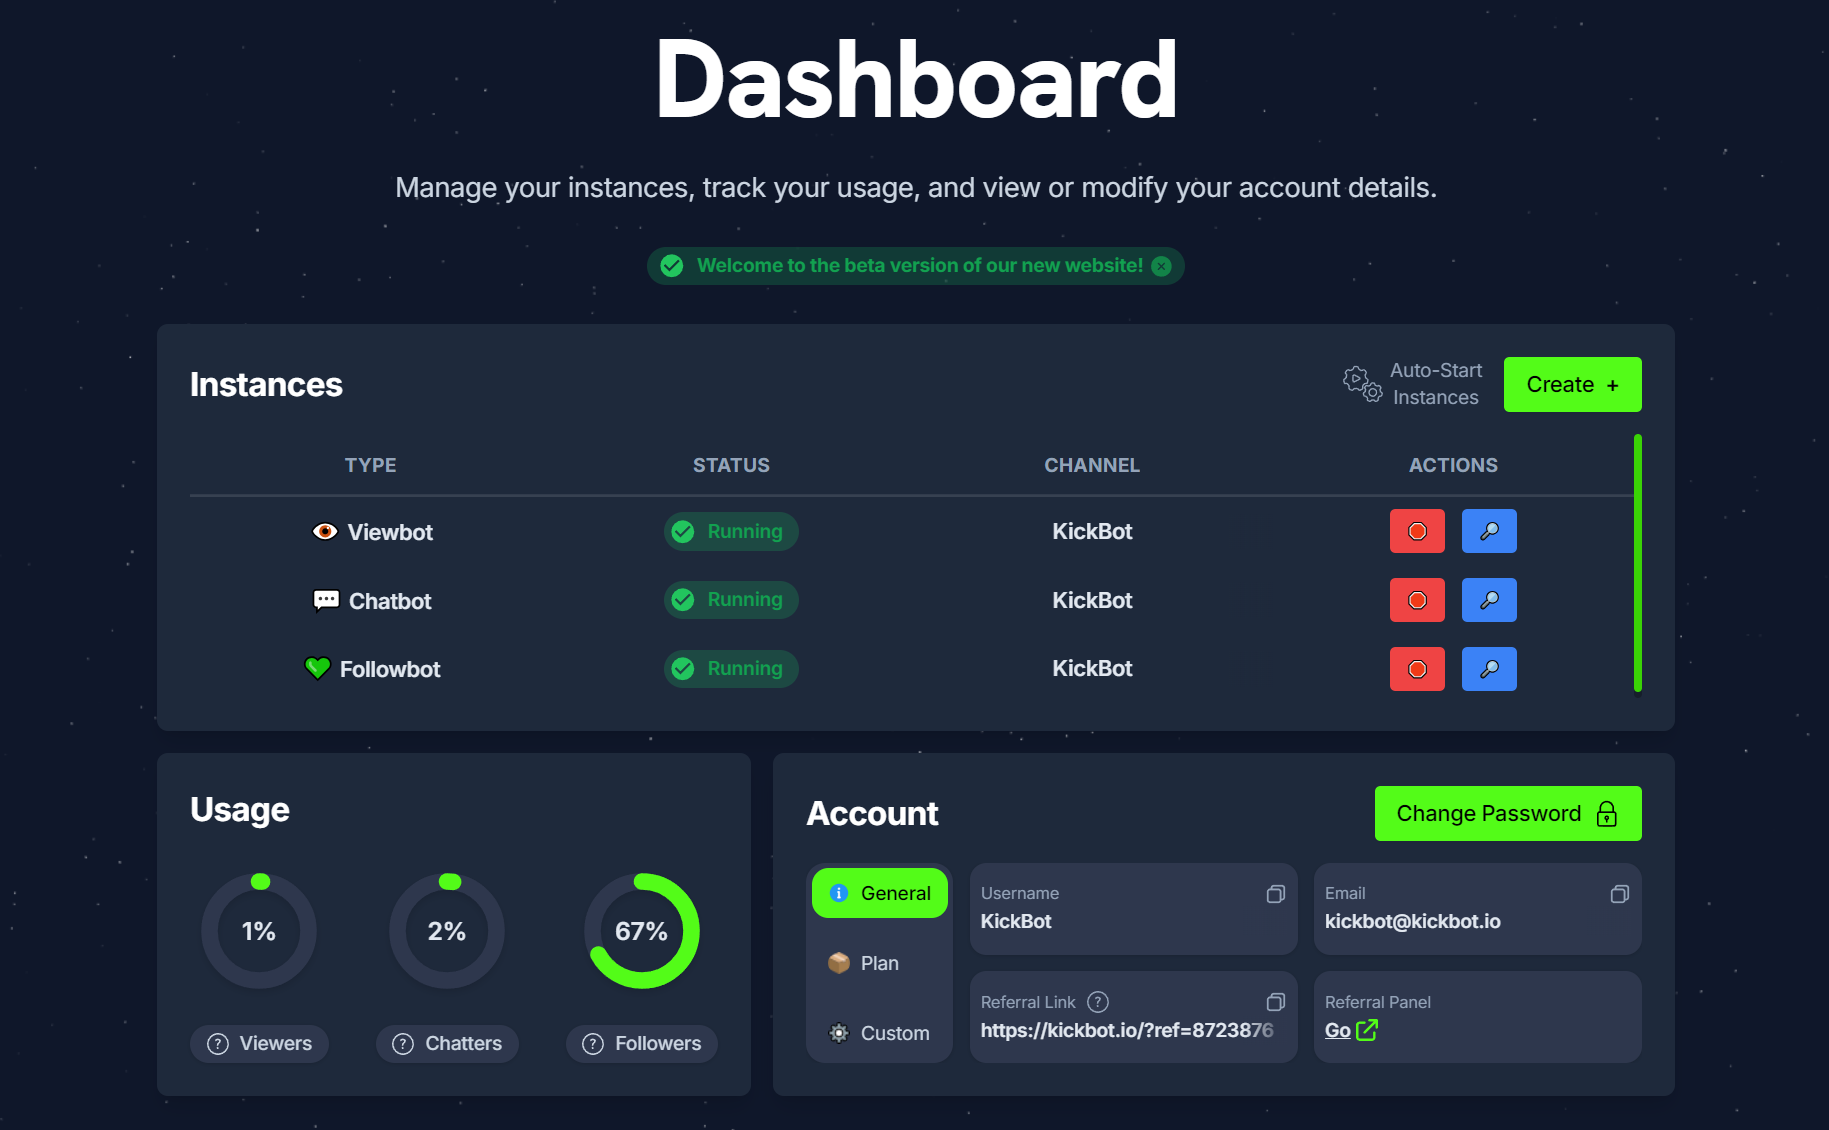
Setting Up Bot Configuration
You’ve chosen your bot software, now it’s time to get down to business and set up your bot configuration.
This is where you’ll define how your bot will operate and interact with your viewers. Start by creating a new configuration file or editing an existing one, depending on your bot software.
This file will contain all the settings and rules that govern your bot’s behavior.
Next, set your bot’s username and password, ensuring they’re unique and secure.
You’ll also need to specify the channels you want your bot to operate in, as well as the commands it should respond to.
Determine the bot’s role and permissions, deciding what actions it can perform, such as kicking, banning, or managing user roles.
Additionally, configure your bot’s messaging settings, including the format and content of its responses.
You may also want to set up custom commands or integrate your bot with other tools and services.
Take your time to carefully review and test your configuration to ensure your bot works as intended.
A well-configured bot is essential to maintaining a positive and engaging community.
Configuring Kick Viewer Settings
Configuring your kick viewer settings is a crucial step in defining how your bot will handle unwanted viewers in your channel.
This is where you’ll decide what kind of behavior warrants a kick, and how the bot will respond to those viewers.
You’ll need to set the kick threshold, which determines how many unwanted actions a viewer can take before they’re kicked from your channel.
You can choose from a range of options, such as the number of spam messages sent, the number of times a viewer has been warned, or even the number of times they’ve been banned in the past.
You’ll also need to decide on the kick reason, which is the message that’s displayed to the viewer when they’re kicked from your channel.
This can be a generic message, or you can customize it to fit your channel’s tone and style.
Additionally, you can set up custom kick messages for specific types of infractions, such as spamming or harassment.
Integrating With Streaming Platform
Most of your Kick Viewer Bot’s functionality relies on its seamless integration with your streaming platform.
To achieve this, you’ll need to connect your bot to your streaming account. Start by logging into your streaming platform’s dashboard and navigating to the developer or API section.
Look for the API token or key, which you’ll need to copy and paste into your Kick Viewer Bot’s settings.
Make sure you have the correct permissions and access levels set up for your bot.
You may need to create a new role or permission group specifically for your bot. Follow the instructions provided by your streaming platform to generate the necessary API credentials.
Once you have the API token or key, head back to your Kick Viewer Bot’s settings and enter the required information.
You may need to specify the streaming platform, API token, and channel information.
Double-check that all the details are accurate and up-to-date to ensure a smooth integration.
With your bot connected to your streaming platform, you’re one step closer to enhancing your viewers’ experience.
Testing and Launching the Bot
The moment of truth has finally arrived – it’s time to test and launch your Kick Viewer Bot.
You’ve set up your bot, integrated it with your streaming platform, and now it’s time to see it in action. Start by testing your bot in a controlled environment, such as a private stream or a test channel.
This will help you identify any potential issues or bugs before you launch it publicly. As you test your bot, pay attention to how it interacts with your viewers, responds to commands, and updates your stream information.
Make sure it’s functioning as expected and fix any issues that arise. Once you’re satisfied with your bot’s performance, you’re ready to launch it publicly.
Update your stream title, description, and tags to reflect your bot’s presence, and let your viewers know that they can interact with it. With your bot up and running, you can focus on promoting it to your audience and encouraging them to engage with it.
As you monitor your bot’s performance, you can refine its settings and fine-tune its behavior to optimize its impact on your stream.
Conclusion
You’ve made it! With your Kick Viewer Bot set up, you’re now equipped to manage your channel with ease. Remember to refine settings as needed and keep an eye on performance. Don’t hesitate to explore additional customization options to get the most out of your bot. You’re in control, and your channel’s a better place for it.